Why Your Laser Cutting Machine Is Not Cutting Through Material and How to Solve It

Introduction to Laser Cutting Penetration Issues
In the high-stakes world of metal fabrication, precision and efficiency are the cornerstones of a successful operation. Whether you are using a high-powered fiber laser or a versatile CO2 system, the expectation is a clean, effortless cut through the workpiece. However, one of the most common and frustrating challenges operators face is when the laser cutting machine is not cutting through material. This issue not only halts production but can also lead to significant material waste and potential damage to the machine’s optical components.
When a laser fails to penetrate the metal, it is rarely a sign of a complete machine failure. More often, it is a symptom of a misalignment in parameters, a lack of routine maintenance, or an environmental factor that has shifted the machine out of its optimal operating window. Understanding the root causes of this problem is essential for any shop manager or operator who wants to minimize downtime and maintain the high standards of quality that HARSLE machines are known for.
This comprehensive guide will delve into the technical reasons behind penetration failure and provide actionable solutions. We will explore everything from the physics of the laser beam to the chemistry of the auxiliary gases. By the end of this article, you will have a robust troubleshooting framework to ensure your laser cutting machine is not cutting through material solve it effectively and permanently.
Key Considerations: Why the Laser Fails to Penetrate
Before diving into the mechanical adjustments, it is important to categorize the potential causes. Generally, penetration issues stem from four main areas: the laser source and delivery system, the cutting parameters, the auxiliary gas system, and the material itself. Each of these areas must be systematically checked to isolate the fault.
1. Laser Power and Beam Quality
The most obvious reason a laser won’t cut through is a lack of sufficient power. This doesn’t always mean the laser source is dying; it could mean the power is being lost before it reaches the material. In fiber lasers, this is often due to a contaminated protective window or a damaged fiber connector. In CO2 lasers, it is frequently caused by dirty or misaligned mirrors. If the beam quality (the BPP or Beam Parameter Product) is degraded, the energy cannot be focused into a small enough spot to melt the metal, resulting in a shallow etch rather than a clean cut.
2. Cutting Speed Discrepancies
Speed is a critical variable in the laser cutting equation. If the cutting speed is too high, the laser beam does not have enough time to melt the material through its entire thickness. Conversely, if the speed is too low, the heat-affected zone (HAZ) becomes too large, causing excessive dross and potentially causing the beam to reflect back or lose its focus. Finding the “sweet spot” for speed is essential for different material thicknesses.
3. Focus Position Errors
The focus position is perhaps the most sensitive parameter in laser cutting. The laser beam is shaped like an hourglass; the narrowest point (the waist) is where the energy density is highest. For thin materials, the focus is usually on the surface. For thicker materials, the focus must be buried deep within the plate. If the focus has drifted due to thermal expansion of the lens or incorrect software settings, the machine will fail to penetrate.
4. Auxiliary Gas Pressure and Purity
Laser cutting is not just about light; it’s about the kinetic energy of gas. Oxygen (O2) acts as a fuel for carbon steel, creating an exothermic reaction that aids the cut. Nitrogen (N2) is used for stainless steel and aluminum to blow away molten metal without oxidation. If the gas pressure is too low, the molten material isn’t cleared from the kerf, causing it to re-weld. If the gas purity is low (especially with Nitrogen), the cutting efficiency drops significantly.
Technical Details: Troubleshooting and Solutions
To effectively address the issue of a laser cutting machine is not cutting through material solve it, we must look at the technical specifics of the machine’s operation. Below is a detailed breakdown of the technical checks you should perform.
Checking the Optical Path and Cleanliness
Contamination is the number one enemy of laser optics. Even a microscopic speck of dust on the protective window of a fiber laser head can absorb laser energy, heat up, and eventually crack the glass or distort the beam. Operators should inspect the protective window daily. If you notice a “thermal lens effect”—where the cut starts fine but fails after a few inches—it is a classic sign of a dirty or damaged lens. Always use high-purity isopropyl alcohol and lint-free swabs for cleaning.
Nozzle Centering and Condition
The laser beam must pass exactly through the center of the nozzle. If the nozzle is slightly offset, the beam may clip the edge of the nozzle, losing power and distorting the beam shape. Furthermore, a damaged or slag-splattered nozzle will disrupt the flow of auxiliary gas, leading to turbulent gas flow that cannot effectively clear the molten metal. Use the “tape test” (firing a low-power pulse through a piece of transparent tape over the nozzle) to verify centering.
Calibrating the Focus Point
Over time, the mechanical zero-point of the cutting head might shift. Most modern HARSLE machines feature auto-focus heads, but these still require periodic calibration. If you are struggling to cut, perform a focus find test. Cut a series of lines at varying focus heights (e.g., from -5mm to +5mm in 0.5mm increments). The line with the narrowest kerf and the least amount of dross indicates the true focal point. Update your cutting parameters based on this physical evidence.
Material Surface and Quality
The condition of the material is often overlooked. Rust, oil, or heavy scale on the surface of carbon steel can reflect the laser beam or interfere with the chemical reaction of the oxygen gas. Similarly, low-grade alloys may contain impurities that create “hard spots” the laser cannot easily penetrate. Ensure the material is clean and flat. If the sheet is warped, the distance-sensing system (capacitance sensor) might struggle to maintain a consistent nozzle-to-workpiece distance, leading to focus fluctuations.
Parameter Optimization Table
Use the following table as a general guide for troubleshooting based on the visual appearance of the failed cut:
| Symptom | Probable Cause | Recommended Solution |
|---|---|---|
| Incomplete penetration at start | Insufficient lead-in power or time | Increase piercing time or initial power. |
| Cut fails halfway through the sheet | Thermal lens effect / Dirty optics | Clean or replace the protective window. |
| Excessive dross at the bottom | Speed too high or gas pressure too low | Reduce speed or increase auxiliary gas pressure. |
| Wide, rough kerf with burning | Focus too high or speed too low | Lower the focus position or increase speed. |
| Sparking upwards instead of downwards | No penetration at all | Check laser power, centering, and focus. |
Selection Advice: Choosing the Right Machine for Your Needs
Preventing penetration issues often starts at the point of purchase. If you frequently find that your laser cutting machine is not cutting through material, it may be that the machine is underpowered for your specific applications. When selecting a HARSLE laser cutting machine, consider the following factors to ensure long-term reliability.
Wattage vs. Thickness
A common mistake is buying a machine that is rated for a maximum thickness that matches your daily production. For example, if you frequently cut 20mm carbon steel, a 3kW fiber laser might technically be able to do it, but it will be at its absolute limit, leading to slower speeds and more frequent penetration failures. Choosing a 6kW or 12kW system provides a “power buffer,” allowing the machine to cut thicker materials with ease and higher reliability.
The Importance of the Cutting Head
Not all cutting heads are created equal. High-end machines utilize intelligent cutting heads with integrated sensors that monitor temperature, gas pressure, and even the condition of the lens. These features can automatically pause the machine if a penetration failure is detected, preventing damage to the workpiece and the machine itself. Investing in a machine with a reputable cutting head (like Precitec or Raytools) is a wise long-term decision.
Stability of the Machine Bed
High-speed laser cutting requires a rigid, vibration-dampened frame. If the machine bed vibrates during the cutting process, the focus point will jitter, leading to inconsistent penetration. HARSLE utilizes heavy-duty, heat-treated welded frames or cast-iron beds to ensure that the mechanical precision remains constant even after years of heavy industrial use.
Frequently Asked Questions (FAQ)
Q1: Why does my laser cut fine for 10 minutes and then stop penetrating?
This is almost certainly due to thermal deformation of the optics, often called “thermal lensing.” Dust or contamination on the lens absorbs laser energy, causing the lens to heat up and expand. This expansion changes the focal length, moving the focus point away from the intended position. Clean your optics and check the cooling system for the cutting head.
Q2: Can I use shop air instead of Nitrogen or Oxygen?
Yes, compressed air can be used for thin materials, but it must be extremely clean and dry. Any moisture or oil in the air line will instantly ruin your protective window and lead to poor cutting quality. You will need a high-quality air dryer and filtration system.
Q3: How often should I calibrate the height sensor?
The capacitance height sensor (which maintains the nozzle-to-plate distance) should be calibrated daily or whenever you change the nozzle. It only takes a few seconds but is vital for ensuring the focus remains consistent across the entire sheet.
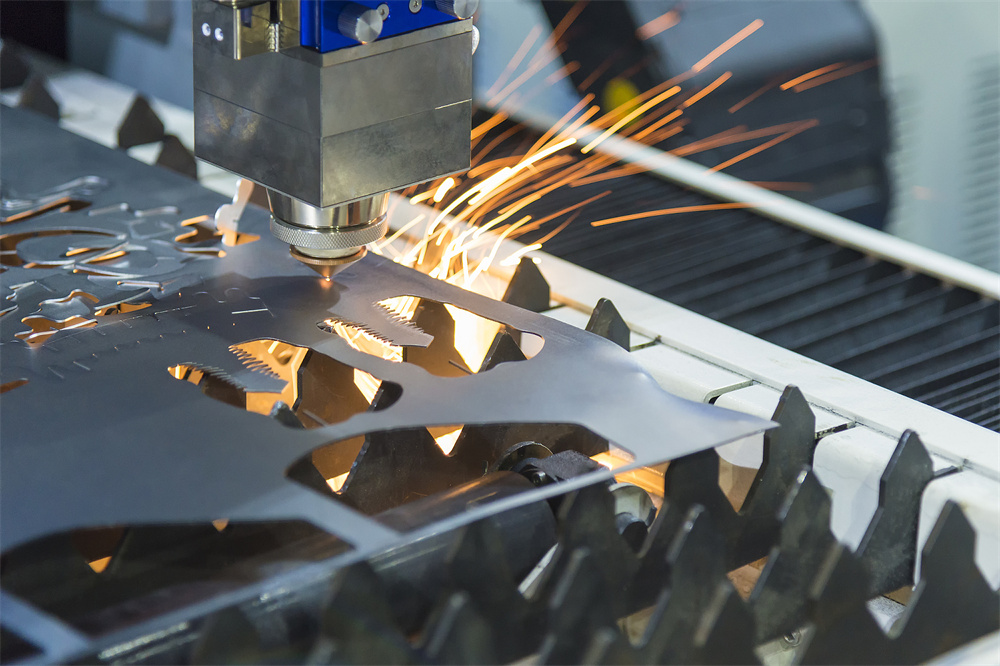
Q4: Does the color of the sparks tell me anything?
Yes! During a successful cut, sparks should fly straight down and out the bottom of the sheet. If the sparks are flying upwards or swirling on the surface, the laser is not penetrating. If the sparks are bright white and violent, you may have too much oxygen pressure or the speed is too slow.
Q5: Is it possible for the fiber cable itself to be the problem?
While rare, fiber cables can degrade if they are bent beyond their minimum radius or if the internal quartz block is damaged. This usually results in a significant and permanent drop in output power. This requires a professional technician to diagnose with a power meter.
Conclusion: Maintaining Peak Performance
Solving the issue of a laser cutting machine is not cutting through material requires a blend of technical knowledge, diligent maintenance, and a systematic approach to troubleshooting. By understanding the interplay between laser power, focus, speed, and gas dynamics, operators can quickly identify and rectify the causes of penetration failure.
At HARSLE, we emphasize that a laser cutting machine is a precision instrument. Regular cleaning of optics, daily calibration of the cutting head, and the use of high-purity gases are not just recommendations—they are requirements for industrial excellence. When you maintain your equipment properly, you not only solve the immediate problem of incomplete cuts but also extend the lifespan of your machine and improve your overall bottom line.
If you have followed the steps in this guide and are still experiencing issues, it may be time to consult with a professional. Our technical support team at HARSLE is always ready to assist you in optimizing your machinery for the best possible results. Remember, a well-tuned machine is the heart of a productive workshop.


