Essential Laser Cutting Machine Maintenance Tasks to Reduce Downtime: The Ultimate Guide

The Critical Role of Maintenance in Modern Metal Fabrication
In the high-stakes world of industrial metal fabrication, the fiber laser cutting machine stands as the centerpiece of production. Whether you are processing stainless steel, carbon steel, or aluminum, the efficiency of your operations depends entirely on the reliability of this sophisticated equipment. Implementing essential laser cutting machine maintenance tasks to reduce downtime is not merely a suggestion; it is a fundamental business strategy. When a machine goes offline unexpectedly, the costs ripple through the entire organization—from missed deadlines and wasted materials to idle labor and damaged reputation.
Modern fiber lasers, such as those manufactured by HARSLE, are engineered for high-speed precision. However, the very technology that allows for micron-level accuracy is also sensitive to environmental factors like dust, heat, and vibration. A comprehensive maintenance program ensures that the laser source, the cutting head, and the motion system operate within their designed parameters. By shifting from a reactive ‘fix-it-when-it-breaks’ mindset to a proactive preventative maintenance schedule, fabricators can extend the lifespan of their investment by years while maintaining the highest possible cut quality.
Furthermore, consistent maintenance directly impacts the safety of the workplace. Laser cutting involves high-voltage electricity, high-pressure gases, and intense thermal energy. A neglected machine is a safety hazard. Blocked exhaust systems can lead to smoke inhalation risks, while faulty electrical connections can cause fires. This guide provides a deep dive into the technical requirements of maintaining a fiber laser, offering a roadmap for operators and shop managers to achieve maximum uptime and peak performance.
Daily Inspection: The First Line of Defense
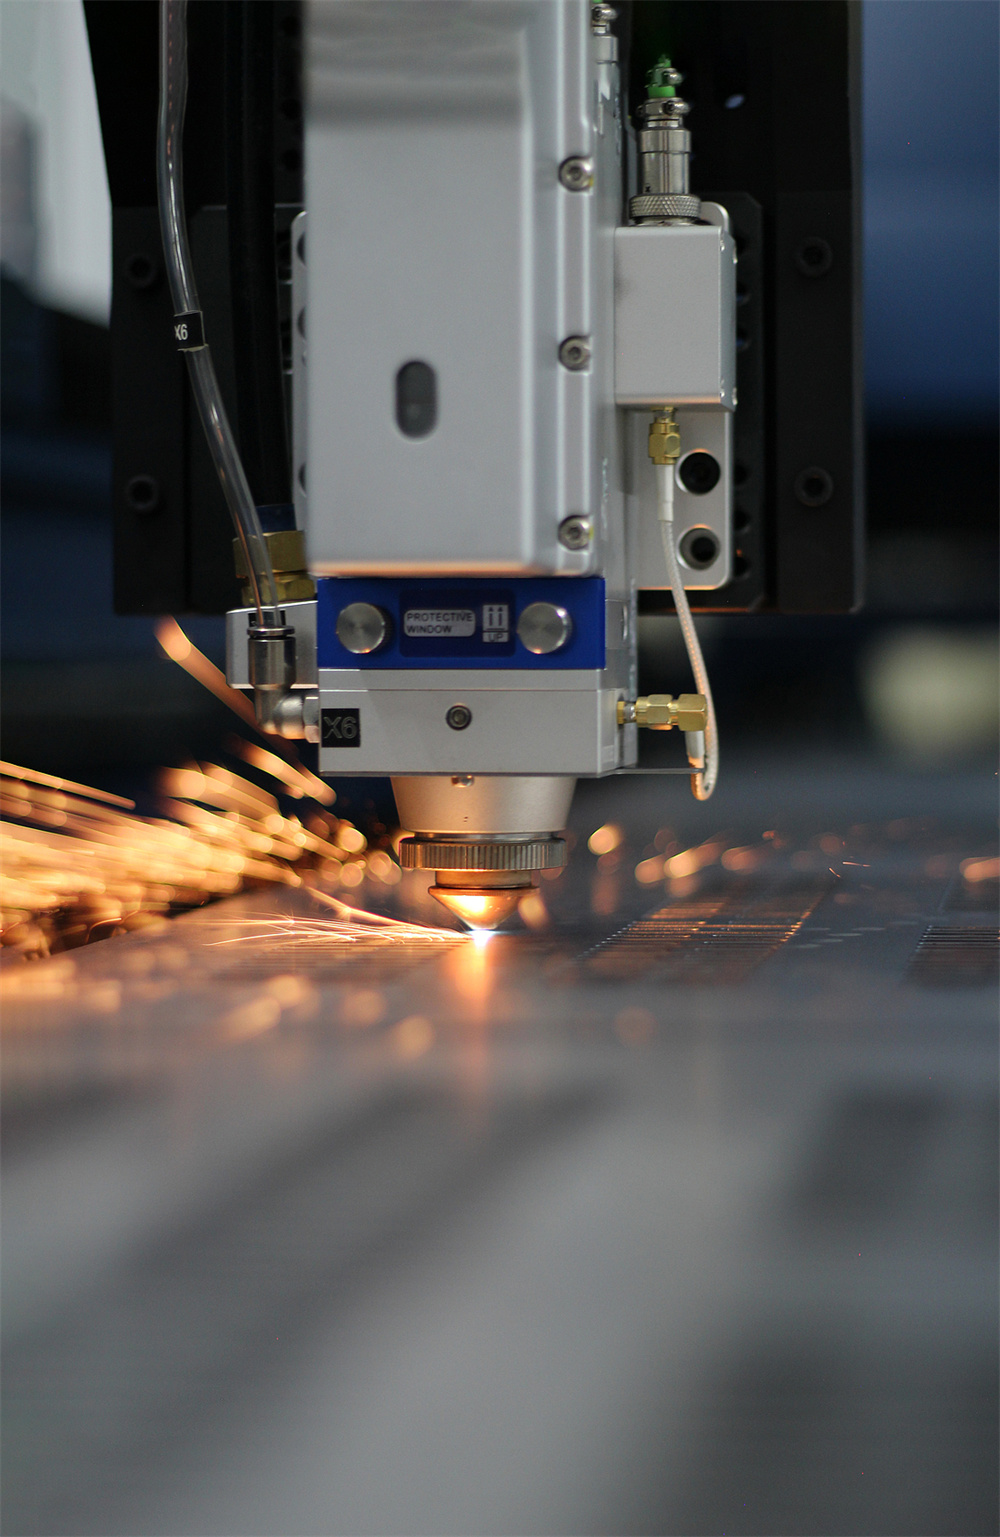
The most effective way to reduce downtime is to catch minor issues before they escalate into major failures. Daily inspections should be the first task performed by every operator at the start of a shift. This routine starts with the cutting head, specifically the protective lens and the nozzle. The protective lens is the final barrier between the expensive internal optics and the sparks generated during cutting. Even a tiny speck of dust on this lens can absorb laser energy, heat up, and eventually crack the lens or damage the cutting head. Operators must inspect the lens in a clean environment and replace it if any burn spots or scratches are visible.
The nozzle is another critical daily check point. The nozzle directs the assist gas and helps stabilize the laser beam. If the nozzle is deformed or has slag buildup, the gas flow becomes turbulent, leading to poor cut quality and potential collisions with the workpiece. Centering the nozzle is equally important; an off-center beam will result in inconsistent cutting directions, where the machine cuts well in one direction but fails in another. Using the ‘tape test’ to ensure the beam is perfectly centered in the nozzle orifice is a quick daily task that prevents hours of troubleshooting later.
Beyond the cutting head, the cooling system—specifically the water chiller—requires daily monitoring. Fiber lasers generate significant heat, and the chiller is responsible for maintaining the laser source and the cutting head at a constant temperature. Check the water level and ensure there are no alarms on the chiller display. The temperature should be set according to the manufacturer’s specifications, usually around 25°C for the laser source and slightly higher for the optics to prevent condensation. A failure in the cooling system can lead to the laser source overheating, which is one of the most expensive repairs a shop can face.
Hydraulic, Electrical, and Mechanical System Checks
While fiber lasers are primarily electronic and optical, their mechanical and electrical subsystems are the workhorses that move the beam with precision. The mechanical system, consisting of the rack and pinion, linear guides, and ball screws, must be checked for debris and wear. Over time, the fine dust produced during the cutting process can settle on the rails, mixing with lubricant to create a grinding paste that accelerates wear. Operators should wipe down the guides and check for any unusual noises or vibrations during high-speed movements, which could indicate a loose component or a failing bearing.
Electrical systems in a laser cutting machine are complex and sensitive. The electrical cabinet should be inspected to ensure that the cooling fans are operational and the filters are clean. Dust accumulation inside the cabinet can cause short circuits or overheating of the servo drivers and the PLC. It is also essential to check the grounding of the machine. Improper grounding can lead to ‘noise’ in the electrical signals, causing the laser to behave erratically or triggering false alarms that lead to unnecessary downtime. Periodically tightening the terminal blocks is also recommended, as vibrations from the machine can loosen electrical connections over time.
The gas delivery system is another area where essential laser cutting machine maintenance tasks reduce downtime. Whether using Oxygen, Nitrogen, or Compressed Air, the regulators and hoses must be leak-free. A leak not only wastes expensive gas but can also cause fluctuations in gas pressure, leading to inconsistent dross and poor edge finish. Check the filters in the gas line to ensure no moisture or oil is reaching the cutting head. Contaminated gas is a leading cause of damaged internal optics, which can take a machine offline for days while waiting for specialized repair services.

The Comprehensive Lubrication Plan
Lubrication is the lifeblood of the laser’s motion system. Without proper lubrication, the friction between moving parts increases, leading to positioning errors and mechanical failure. Most modern HARSLE laser machines are equipped with an automatic lubrication system, but this does not mean it can be ignored. The oil reservoir must be kept full with the correct grade of lubricant specified by the manufacturer. Using the wrong oil can be just as damaging as using no oil at all, as some lubricants can gum up the small distribution lines or fail to provide adequate film strength at high speeds.
For machines with manual lubrication points, a strict schedule must be followed. The X, Y, and Z axes each have specific requirements. The Z-axis, which controls the height of the cutting head, often requires more frequent attention because it moves constantly to maintain the focal point over uneven metal sheets. Before applying new grease, it is vital to clean off the old, dirty grease. Simply adding new lubricant on top of dirt only pushes the contaminants deeper into the bearings. A clean, well-lubricated machine moves smoothly, reduces the load on servo motors, and ensures that the machine maintains its accuracy over years of heavy use.
In addition to the guide rails, the rack and pinion system requires specialized lubrication. Since these are open components, they are particularly susceptible to the metallic dust generated during cutting. Some shops use a dry lubricant or a specialized gear grease that resists dust adhesion. Regularly cleaning the teeth of the rack with a soft brush and applying a thin, even coat of lubricant will prevent ‘backlash’—the play between gears that results in jagged cuts and rounded corners on parts that should be sharp.
Identifying Troubleshooting Signals Before Failure
Experienced operators develop an ‘ear’ for their machines, but anyone can learn to identify the warning signs of impending trouble. One of the most common signals is a change in the sound of the cutting process. A smooth, consistent hiss indicates proper gas flow and cutting, while a sputtering or whistling sound suggests a nozzle issue or incorrect gas pressure. Similarly, if the machine begins to vibrate excessively during high-speed traverses, it may indicate that the mechanical components are out of alignment or that the servo motors need tuning.
The quality of the cut edge is the most honest indicator of the machine’s health. If you notice an increase in dross (slag) on the bottom of the parts, it could mean the protective lens is dirty, the focus is drifting, or the assist gas purity has dropped. Inconsistent cutting—where the machine cuts perfectly on one side of the table but struggles on the other—usually points to a leveling issue with the machine bed or a misalignment in the beam delivery path (in the case of CO2 lasers) or a cable carrier issue (in fiber lasers). Monitoring these essential laser cutting machine maintenance tasks to reduce downtime allows for ‘predictive maintenance,’ where parts are replaced based on their performance rather than waiting for a total breakdown.
Another troubleshooting signal is the frequency of ‘head collisions.’ While modern machines have height sensors to avoid obstacles, frequent alarms or ‘capacitive sensing’ errors often indicate that the sensor calibration is off or that the ceramic ring on the cutting head is cracked. These small components are inexpensive but critical. Keeping a stock of common consumables like nozzles, ceramics, and lenses allows the operator to swap them out immediately when performance dips, keeping the machine running while the root cause is investigated.
Comprehensive Maintenance Schedule Table
| Frequency | Component | Maintenance Task | Objective |
|---|---|---|---|
| Daily | Cutting Head | Clean and inspect protective lens and nozzle | Prevent optical damage and ensure cut quality |
| Daily | Water Chiller | Check water levels and temperature settings | Prevent laser source overheating |
| Daily | Machine Bed | Clean scrap and debris from the slats | Ensure material sits flat and prevent collisions |
| Weekly | X/Y/Z Axes | Wipe down guide rails and check lubrication | Maintain motion precision and reduce wear |
| Weekly | Exhaust System | Check dust collector and clean filters | Maintain air quality and prevent smoke buildup |
| Monthly | Electrical Cabinet | Vacuum dust and check cooling fans | Prevent electronic component failure |
| Monthly | Gas Lines | Inspect hoses and regulators for leaks | Reduce gas waste and maintain pressure stability |
| Quarterly | Water Chiller | Change cooling water and clean filters | Prevent algae growth and maintain cooling efficiency |
| Bi-Annually | Mechanical System | Check rack and pinion alignment and tightness | Ensure long-term accuracy and prevent backlash |
| Annually | Full System | Professional calibration and laser source check | Verify machine performance to factory standards |
Frequently Asked Questions (FAQ)
1. Why is my fiber laser cutting quality suddenly decreasing?
Decreased cut quality is usually caused by a dirty protective lens, a worn nozzle, or incorrect focal settings. Start by inspecting the consumables. If those are clean, check the gas pressure and purity. If the issue persists, it may be a sign that the laser beam is not centered or the chiller is not maintaining the correct temperature, causing thermal drift in the optics.
2. How often should I change the water in my laser chiller?
For most industrial environments, the water in the chiller should be changed every 3 to 6 months. It is critical to use deionized or distilled water as specified by HARSLE to prevent mineral buildup and electrolysis. In colder climates, ensure the correct ratio of antifreeze is used if the machine is at risk of freezing, but always consult the manual first as some additives can damage the laser source.
3. Can I use compressed air for all my cutting needs?
While compressed air is a cost-effective assist gas for thin materials, it must be extremely clean and dry. Any oil or moisture in the air line will instantly ruin the protective lens and potentially damage the internal optics of the cutting head. If you use compressed air, ensure you have a high-quality refrigerated dryer and a multi-stage filtration system in place.
4. What are the signs that my rack and pinion need attention?
The most common signs are ‘ghosting’ or jagged edges on circular cuts, and a noticeable ‘clunking’ sound during direction changes. You can also perform a backlash test using a dial indicator. Regular cleaning and lubrication are the best ways to prevent these issues. If the teeth are visibly worn or chipped, the rack or pinion gear may need replacement to restore accuracy.
5. How do I know when to replace the protective lens?
Inspect the lens daily. If you see any permanent black spots (burns), scratches, or a ‘cloudy’ appearance that cannot be cleaned with high-purity alcohol and lint-free swabs, it must be replaced. Using a compromised lens will cause the laser beam to scatter, leading to poor cuts and potentially causing the lens to shatter due to uneven thermal expansion.
Conclusion: Investing in Longevity
Executing essential laser cutting machine maintenance tasks to reduce downtime is the hallmark of a professional fabrication shop. By following the daily, weekly, and monthly protocols outlined in this guide, you protect your equipment, your employees, and your bottom line. A HARSLE laser cutting machine is a powerful tool capable of incredible productivity, but its performance is a direct reflection of the care it receives. Treat your machinery with the respect its precision demands, and it will provide you with reliable, high-quality service for many years to come.


