Laser Cutting Machine Lens Cleaning and Maintenance Tips to Prevent Cutting Defects

Introduction to Laser Optics Maintenance and Cutting Quality
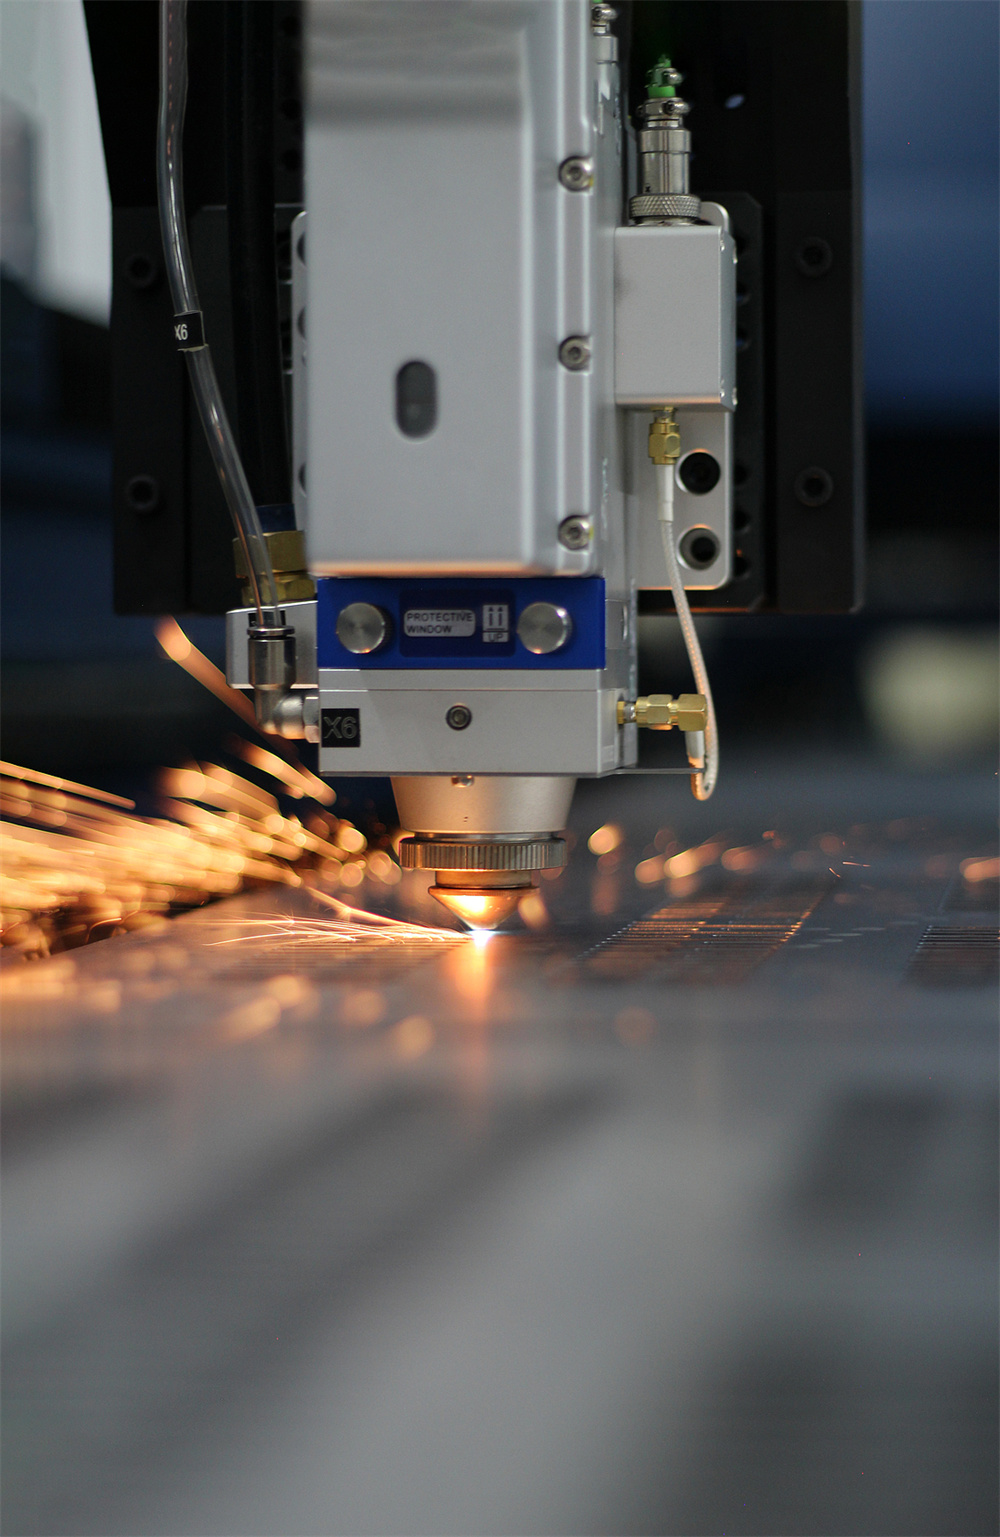
In the high-precision world of metal fabrication, the performance of a fiber laser cutting machine is heavily dependent on the integrity of its optical system. The lens is the heart of the cutting head, responsible for focusing the high-energy laser beam onto the workpiece with surgical precision. However, during the cutting process, factors such as metal vapor, dust, and assist gas impurities can contaminate these sensitive components. When the lens becomes dirty or damaged, it leads to a cascade of issues, collectively known as cutting defects. These include excessive dross, irregular kerf widths, and incomplete cuts that can ruin expensive raw materials.
For operators using HARSLE laser cutting machines, understanding the nuances of Laser Cutting Machine Lens Cleaning Maintenance Tips Prevent Cutting Defects is not just a matter of routine; it is a critical factor in maintaining operational efficiency and product quality. A clean lens ensures that the laser energy is transmitted with minimal absorption or scattering. Conversely, even a microscopic speck of dust can absorb laser energy, causing the lens to heat up unevenly—a phenomenon known as thermal lensing—which shifts the focal point and degrades the cut quality instantly.
This comprehensive guide is designed to provide industrial professionals with the technical knowledge required to maintain their laser optics. We will explore the tools needed, the step-by-step cleaning procedures, and the preventative measures that can extend the lifespan of your consumables. By following these professional maintenance protocols, you can significantly reduce downtime and ensure that your HARSLE equipment continues to deliver the high-speed, high-accuracy performance it was designed for.
Key Considerations Before Cleaning Laser Lenses
Before attempting any maintenance on the optical components of a laser cutting machine, safety and environmental control must be the top priorities. Laser lenses, particularly those made of Zinc Selenide (ZnSe) or high-purity Fused Silica, are extremely delicate and susceptible to scratches. Furthermore, the coatings applied to these lenses are designed to handle specific wavelengths; any abrasion can strip these coatings, rendering the lens useless. Always ensure the machine is completely powered down and the laser source is locked out to prevent accidental discharge.
The environment in which you perform the cleaning is equally important. Ideally, lens maintenance should be conducted in a clean, dust-free area. In a busy fabrication shop, this might mean setting up a dedicated workstation away from grinding sparks and heavy dust. If dust particles settle on the lens while you are cleaning it, the act of wiping can cause those particles to scratch the surface. Operators should wear powder-free latex or nitrile gloves to prevent skin oils from transferring to the lens, as these oils can burn under the laser’s heat and cause permanent damage.
Another key consideration is the quality of the cleaning agents. Only use high-purity chemicals, such as 99.9% isopropyl alcohol or reagent-grade acetone. Standard drugstore rubbing alcohol contains water and oils that leave streaks. Similarly, the wiping materials must be non-abrasive. Specialized lens tissue or high-quality cotton swabs (specifically those designed for optics) are mandatory. Using a standard paper towel or a shop rag is a guaranteed way to destroy a multi-thousand-dollar lens in seconds.
Finally, understand the difference between the protective window and the focusing lens. The protective window (or cover glass) is the first line of defense and is designed to be replaced more frequently. The focusing lens is deeper within the cutting head and requires less frequent but more careful handling. Distinguishing between these components ensures that you apply the correct level of care and use the appropriate consumables for each part of the optical path.
Technical Details: The Step-by-Step Cleaning Process
1. Inspection and Initial Dust Removal
The first step in the Laser Cutting Machine Lens Cleaning Maintenance Tips Prevent Cutting Defects protocol is a thorough inspection. Use a bright light or a magnifying glass to examine the lens surface at an angle. Look for dust, fingerprints, or “burn spots.” Before applying any liquid, use a specialized air bulb or filtered, dry compressed air to blow away loose particles. Never use your breath, as it contains moisture and oils. This initial step is crucial because it removes the grit that could cause scratches during the subsequent wet-cleaning phases.
2. The “Drop and Drag” Method
For flat surfaces like protective windows, the “drop and drag” method is the safest technique. Place a piece of lens tissue flat on the lens surface. Apply one or two drops of high-purity isopropyl alcohol onto the tissue. Slowly and steadily drag the tissue across the lens so that the liquid film evaporates uniformly behind the tissue. This method ensures that the only thing touching the lens is the liquid and the soft tissue, minimizing the risk of mechanical scratching. Repeat this process with a fresh piece of tissue until no streaks or contaminants are visible.
3. Cleaning the Focusing Lens with Cotton Swabs
If the lens has a curved surface, such as a focusing lens, the drop and drag method may not be effective. In this case, use a high-quality cotton swab moistened with cleaning fluid. Start at the center of the lens and move outward in a slow, spiral motion. Do not apply heavy pressure; let the chemical action of the solvent lift the contaminants. It is vital to use a new swab for every pass to avoid re-depositing dirt. Once the wet cleaning is done, use a dry swab in the same spiral motion to remove any remaining solvent before it can leave a residue.

4. Dealing with Stubborn Contaminants
Sometimes, metal spatter or “pitting” occurs on the protective window. If a contaminant does not come off with isopropyl alcohol, you may try reagent-grade acetone, which is a stronger solvent. However, be extremely careful as acetone can damage the plastic or rubber seals of the cutting head if it drips. If the contaminant is a physical pit (a small hole burned into the glass), cleaning will not help. In this scenario, the component must be replaced immediately, as the pit will scatter the laser beam and cause significant cutting defects.
Identifying and Preventing Cutting Defects via Optics Care
How do you know when your maintenance routine is failing? The workpiece usually tells the story. One of the most common defects caused by dirty optics is the appearance of heavy dross or slag on the bottom of the cut. When the lens is dirty, it absorbs energy, reducing the power density at the focal point. This means the metal is not fully vaporized or melted cleanly, leaving behind jagged edges. If you notice that you have to slow down the cutting speed to achieve a full cut, it is a classic sign that your optics are losing transmissive efficiency.
Another defect is “beam drift” or an asymmetrical kerf. If one side of the cut is smooth while the other is rough, or if the laser fails to cut in one specific direction (e.g., only failing on Y-axis moves), it often indicates that a contaminant is blocking or refracting part of the beam. This creates an uneven energy distribution. Furthermore, thermal lensing can cause the focal point to “drift” upward during a long cutting job. You might start with a perfect cut, but after ten minutes, the quality degrades as the lens heats up and expands, changing its refractive index.
To prevent these defects, HARSLE recommends a proactive approach. Don’t wait for the cut quality to drop before checking your lenses. Implement a “check-before-shift” policy where the protective window is inspected at the start of every work day. Additionally, monitor the quality of your assist gases. If your air compressor filters are saturated with oil or moisture, they will blow contaminants directly onto the lens during the cutting process, undoing all your cleaning efforts in a matter of seconds.
Selection Advice for Laser Consumables and Cleaning Tools
Choosing the right consumables is as important as the cleaning process itself. When purchasing replacement protective windows or focusing lenses, always opt for high-quality materials that match the specifications of your HARSLE machine. For fiber lasers, fused silica is the standard due to its high damage threshold and low thermal expansion. Ensure the optics have the correct Anti-Reflective (AR) coatings for the 1064nm-1080nm wavelength range typical of fiber lasers.
| Tool/Consumable | Recommended Specification | Purpose |
|---|---|---|
| Cleaning Solvent | 99.9% Isopropyl Alcohol or Reagent Acetone | Dissolving oils and removing residues without leaving streaks. |
| Wiping Material | Polyester Lens Swabs or Optics Tissue | Non-abrasive application of solvents and physical cleaning. |
| Air Source | Rubber Air Bulb or Filtered Nitrogen | Removing loose dust without introducing moisture or oils. |
| Protective Gear | Powder-free Nitrile Gloves | Preventing skin oils from contaminating the optical surfaces. |
| Inspection Tool | LED Inspection Light (High Intensity) | Revealing microscopic scratches and surface contaminants. |
When selecting cleaning kits, avoid generic “camera cleaning kits” which may contain detergents that are harmful to industrial laser coatings. Instead, invest in industrial-grade optics cleaning kits specifically rated for high-power laser systems. While these may be more expensive, the cost is negligible compared to the price of replacing a damaged focusing lens or the lost revenue from a day of scrapped parts.
Maintenance Schedule and Best Practices
Consistency is the key to longevity in metal fabrication machinery. A structured maintenance schedule ensures that no component is overlooked. For most industrial environments, the following schedule is recommended:
- Daily: Inspect the protective window (cover glass) every 4-8 hours of operation. Clean if any dust or spots are visible. Check the assist gas pressure and filter indicators.
- Weekly: Perform a deeper inspection of the cutting head exterior. Check for any signs of gas leaks or loose components that could allow dust to enter the optical chamber.
- Monthly: Inspect the internal focusing lens (if the machine design allows for safe operator access). Check the alignment of the laser beam to ensure it is centered in the nozzle.
- Quarterly: Replace the protective window regardless of visible damage if the machine has been running at high power for extended periods, as micro-degradations in the coating can occur.
Beyond the schedule, foster a culture of cleanliness among operators. Ensure that the area around the laser machine is swept regularly and that the machine’s own dust extraction system is functioning at peak capacity. The less dust there is in the air, the less maintenance your lenses will require. Always keep spare protective windows in stock; an operator is more likely to replace a damaged window immediately if a spare is readily available, rather than trying to “push through” and risking damage to the more expensive internal optics.
Frequently Asked Questions (FAQ)
How often should I clean my laser lens?
The frequency depends on your workload and the material being cut. For example, cutting galvanized steel or aluminum produces more fumes and spatter than stainless steel. At a minimum, the protective window should be inspected daily. If you notice any degradation in cut quality, the lens should be the first thing you check.
Can I use regular glass cleaner on my laser optics?
Absolutely not. Regular glass cleaners contain ammonia, perfumes, and other chemicals that leave a film on the lens. Under the heat of a high-power laser, this film will burn and permanently damage the lens coating. Only use high-purity isopropyl alcohol or acetone.
What is ‘thermal lensing’ and how does it affect my machine?
Thermal lensing occurs when a dirty lens absorbs laser energy and heats up. This heat causes the lens to expand and change its refractive properties, which shifts the focal point. This results in inconsistent cutting depths and poor edge quality as the machine continues to run.
When should I replace the lens instead of cleaning it?
If you see a permanent “burn mark,” a scratch that cannot be cleaned off, or pitting on the surface, the lens must be replaced. Using a damaged lens can cause the laser beam to reflect back into the laser source, potentially causing thousands of dollars in damage to the fiber cable or the resonator.
Does the type of assist gas affect lens cleanliness?
Yes. If you are using shop air, it must be extremely dry and oil-free. If you are using bottled oxygen or nitrogen, ensure the gas is of high purity (99.95% or higher). Contaminants in the gas are blown directly onto the lens at high pressure, which is a leading cause of premature lens failure.
Conclusion
Maintaining the optics of your laser cutting machine is one of the most cost-effective ways to ensure high-quality production and long-term machine health. By following these Laser Cutting Machine Lens Cleaning Maintenance Tips Prevent Cutting Defects, you protect your investment and ensure that every part leaving your shop meets the highest standards of precision. HARSLE machines are built for durability and performance, but like any high-end industrial tool, they require diligent care. Regular inspection, the use of proper cleaning techniques, and the selection of high-quality consumables will keep your laser cutting operations running smoothly, minimizing waste and maximizing profitability in the competitive world of metal fabrication.


