Laser Cutting Machine Lens and Nozzle Maintenance Best Practices: The Ultimate Guide

The Critical Role of Maintenance in Modern Laser Cutting
In the high-precision world of metal fabrication, the fiber laser cutting machine stands as a pinnacle of engineering. However, the performance of even the most advanced HARSLE laser system is heavily dependent on the condition of its most vulnerable components: the lens and the nozzle. Adhering to Laser Cutting Machine Lens Nozzle Maintenance Best Practices is not merely a suggestion; it is a fundamental requirement for any shop aiming to maintain high throughput, pinpoint accuracy, and low operational costs. When these components are neglected, the machine’s efficiency plummets, leading to increased dross, wider kerfs, and potentially catastrophic damage to the expensive laser source or cutting head.
The lens and nozzle are the final gatekeepers of the laser beam. The nozzle directs the assist gas and stabilizes the pressure around the cut, while the lens focuses the high-energy photons into a concentrated point capable of vaporizing steel. Any contamination—be it dust, oil mist, or metal splatter—can absorb laser energy, causing localized heating. This thermal distortion, often called “thermal lensing,” shifts the focal point and degrades the beam quality. Over time, this leads to poor edge finishes and necessitates slower cutting speeds, directly impacting your bottom line. By implementing a rigorous maintenance routine, operators can ensure that their HARSLE equipment operates at peak performance for years.
Furthermore, proactive maintenance reduces the Total Cost of Ownership (TCO). While high-quality consumables like copper nozzles and protective windows are relatively inexpensive, the downtime associated with a failed cutting head is not. A well-maintained machine experiences fewer unplanned stops, allowing for better production planning and more reliable delivery schedules. This guide delves deep into the technical nuances of maintaining these critical parts, providing a roadmap for operators to achieve excellence in their daily fabrication tasks.

Finally, understanding the relationship between the machine’s environment and its maintenance needs is vital. In a dusty fabrication shop, the frequency of lens inspection must be higher than in a climate-controlled facility. HARSLE machines are built for durability, but the laws of physics regarding optics remain constant. Cleanliness is the primary defense against the degradation of laser power. In the following sections, we will explore the specific steps required to keep your optics pristine and your nozzles perfectly aligned.
Daily Inspection Protocols for Lenses and Nozzles
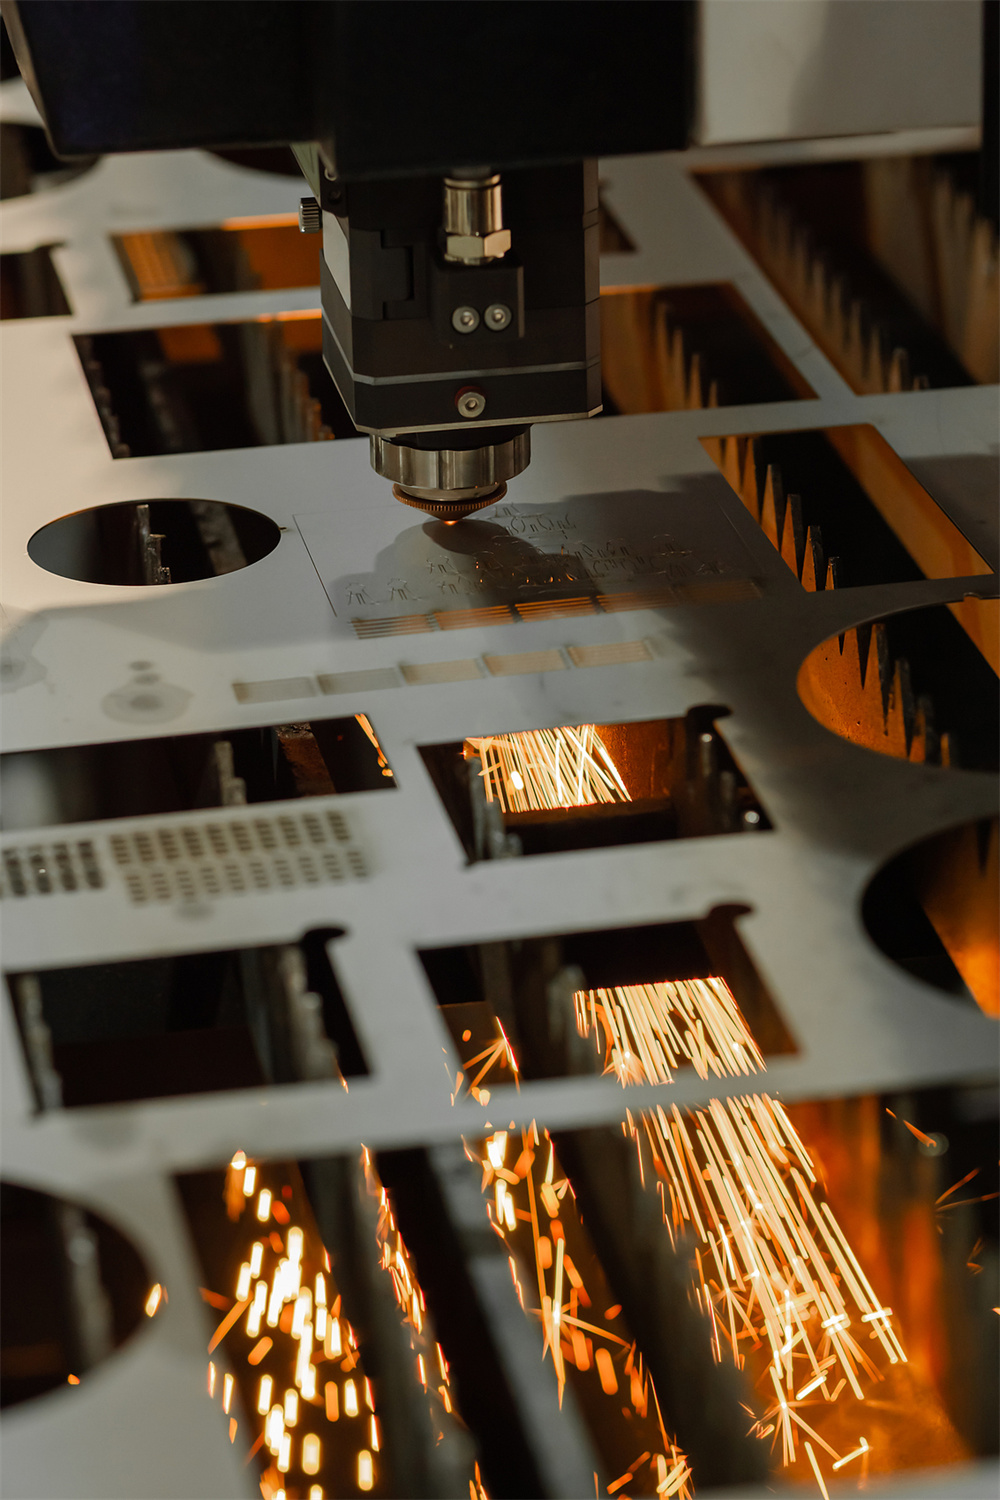
The first step in Laser Cutting Machine Lens Nozzle Maintenance Best Practices is the daily inspection. This should be performed at the start of every shift. Before the machine begins its first cut, the operator must visually inspect the nozzle for any signs of physical damage or slag buildup. A deformed nozzle tip can disrupt the laminar flow of the assist gas, leading to turbulence that causes inconsistent cuts or excessive burrs on the underside of the workpiece. If the nozzle shows signs of wear or if the orifice is no longer perfectly circular, it should be replaced immediately.
Nozzle centering is perhaps the most critical daily task. Even a slight misalignment between the laser beam and the center of the nozzle orifice can cause the beam to clip the side of the nozzle. This not only damages the nozzle but also results in a skewed beam profile, causing the machine to cut differently in the X and Y directions. The “Tape Test” is the industry standard for checking this: place a piece of transparent tape over the nozzle, fire a low-power pulse, and observe if the hole is perfectly centered. If not, the manual or automatic centering screws must be adjusted until the alignment is perfect.
The protective window (or cover slide) is the lens’s first line of defense. It must be checked multiple times a day, especially when cutting thick materials that produce significant splatter. To inspect the lens, the operator should use a high-intensity LED flashlight. By shining the light at an angle across the surface of the glass, even the smallest specks of dust or “burn spots” become visible. If any contamination is found, the lens must be cleaned using 99.9% anhydrous isopropanol and lint-free optical wipes. Never use compressed air from a shop line to blow off a lens, as it contains oil and moisture that will permanently ruin the coating.
In addition to physical checks, monitoring the machine’s software feedback is essential. Modern HARSLE fiber lasers often include sensors that monitor the temperature of the cutting head and the condition of the protective window. If the system throws a “Lens Temperature High” warning, the operator must stop immediately. Continuing to cut with a dirty lens can lead to the glass cracking or even the laser beam reflecting back into the fiber, causing thousands of dollars in damage. Daily vigilance is the cheapest insurance policy a fabrication shop can have.
Hydraulic, Electrical, and Mechanical System Checks
While the focus of this guide is on optics, the Laser Cutting Machine Lens Nozzle Maintenance Best Practices must also encompass the systems that support the cutting head. In a fiber laser, the “hydraulic” equivalent is the high-pressure gas delivery system. Operators must check the integrity of the gas lines and regulators daily. A leak in the nitrogen or oxygen line not only wastes expensive gas but can also introduce impurities into the cutting zone, leading to oxidation or poor melt expulsion. Ensure that the gas filters are clean and that the pressure delivered to the head matches the parameters set in the CNC controller.
The electrical system, specifically the water chiller, is vital for lens longevity. The chiller regulates the temperature of the laser source and the cutting head. If the coolant temperature fluctuates, the optical components will expand and contract, leading to focal shift. Check the chiller’s water level and conductivity weekly. Use only deionized water as specified by HARSLE to prevent mineral buildup inside the cooling channels of the cutting head. A clogged cooling channel can cause the lens to overheat even if it is perfectly clean.
Mechanically, the gantry’s precision directly affects how the beam interacts with the nozzle. If the X, Y, or Z-axis has any backlash or vibration, the nozzle-to-workpiece distance (standoff height) will fluctuate. The capacitive height sensor, which is integrated into the nozzle assembly, must be calibrated daily. This sensor ensures that the nozzle maintains a constant distance from the metal sheet, even if the sheet is warped. Ensure the sensor cable is securely fastened and free from kinks, as a faulty signal can cause the head to crash into the workpiece, destroying both the nozzle and the internal optics.
Finally, the mechanical stability of the lens mounting must be verified. Over time, the vibrations from high-speed cutting can loosen the retaining rings that hold the lenses in place. During deep-clean sessions, ensure that all optical elements are seated firmly. However, be extremely careful not to over-tighten, as this can induce mechanical stress in the glass, leading to birefringence and a distorted laser beam. Balancing mechanical rigidity with delicate handling is the hallmark of a skilled laser technician.
Comprehensive Lubrication and Cleaning Plan
A clean machine is a precise machine. The Laser Cutting Machine Lens Nozzle Maintenance Best Practices extend to the lubrication of the motion system, which prevents metallic dust from settling on sensitive areas. The rack and pinion, as well as the linear guides, should be cleaned of old grease and debris before applying fresh lubricant. HARSLE recommends using a high-quality lithium-based grease. If the rails are dirty, the vibration will transmit to the cutting head, causing “jitter” in the cut edge, which is often mistaken for a lens issue.
The cleaning of the nozzle itself involves more than just wiping the outside. Slag can accumulate inside the nozzle orifice, partially blocking the gas flow. Use a soft brass wire brush or a specialized nozzle cleaning needle to gently remove any debris. Avoid using steel tools that could scratch the copper, as scratches create turbulence. For the lens, the cleaning process must be performed in a “clean-box” environment if possible. Use the “drop and drag” method: place a lens tissue on the glass, apply a drop of solvent, and slowly pull the tissue across the surface. This ensures that any abrasive particles are lifted away rather than rubbed into the coating.
The internal chambers of the cutting head should also be purged with dry, filtered air or nitrogen periodically. Even with protective windows, microscopic dust can eventually find its way into the upper collimating lens area. Maintaining a positive pressure of clean gas inside the head is a standard feature on HARSLE machines that helps prevent this. Operators should verify that this purge gas is flowing correctly. If the machine has been idle for a long period, a longer purge cycle is recommended to clear out any settled moisture or particles before firing the laser.
Lastly, don’t forget the external environment. The area around the laser machine should be kept clear of scrap metal and dust. A high-volume dust collector (fume extractor) is essential. If the extractor is not working efficiently, the smoke and dust generated during the cutting process will linger in the air and eventually settle on the nozzle and the protective window, necessitating more frequent cleaning and increasing the risk of component failure. A holistic approach to cleanliness is the best way to support your maintenance efforts.
Identifying Troubleshooting Signals
Even with the best Laser Cutting Machine Lens Nozzle Maintenance Best Practices, components will eventually wear out or fail. Recognizing the early warning signs can save a shop from producing a large batch of scrap parts. One of the most common signals is the appearance of “dross” or “slag” on the bottom of the cut. If this occurs suddenly, it usually indicates that the nozzle is clogged or the lens is dirty. If the dross is only on one side of the cut, it is a definitive sign that the nozzle is not centered correctly.
Another signal is a change in the “spark pattern” during the cutting process. An experienced operator knows what a healthy cut looks like—sparks should be directed straight down through the kerf. If sparks begin to fly upward or out at an angle, it suggests that the laser beam is no longer focused correctly or the gas pressure is insufficient. This is often caused by a “burnt spot” on the protective window, which scatters the beam. Checking the window immediately when the spark pattern changes can prevent the damage from spreading to the more expensive focusing lens above it.
The sound of the cutting process is also a diagnostic tool. A clean, efficient cut produces a consistent, high-pitched hiss. A “fluttering” or “popping” sound indicates turbulent gas flow, likely due to a damaged nozzle tip or an incorrect standoff height. Furthermore, if the machine struggles to pierce the material, or if the pierce time increases significantly, the lens is likely losing its ability to focus energy due to thermal lensing. Monitoring these subtle changes in the machine’s behavior allows for “predictive maintenance,” where parts are replaced just before they fail.
Finally, inspect the cut edge quality. A “fuzzy” or rounded top edge often indicates that the focus is too high, while a wide, messy bottom edge indicates the focus is too low. However, if the focus settings in the CNC are correct but the results are poor, the lens has likely shifted or is contaminated. By correlating specific cut defects with lens and nozzle conditions, operators can quickly diagnose and resolve issues, minimizing the impact on production schedules.
Maintenance Schedule Table
To ensure consistency, every shop should follow a structured maintenance schedule. Below is a recommended timeline for HARSLE fiber laser cutting machines.
| Frequency | Component | Action Required |
|---|---|---|
| Every Shift | Nozzle | Check for slag, centering (Tape Test), and physical damage. |
| Every Shift | Protective Window | Visual inspection with flashlight; clean if any dust is present. |
| Daily | Height Sensor | Calibrate the capacitive sensor and check the cable. |
| Weekly | Chiller System | Check water levels, conductivity, and clean the air filters. |
| Weekly | X/Y/Z Rails | Wipe clean and apply fresh lithium grease. |
| Monthly | Internal Optics | Inspect collimating and focusing lenses (clean room environment). |
| Monthly | Gas Filters | Check and replace assist gas filters if necessary. |
| Quarterly | Electrical Cabinet | Vacuum dust from fans and check for loose connections. |
Frequently Asked Questions (FAQ)
1. How often should I replace my laser nozzle?
There is no fixed timeframe for nozzle replacement. It depends on the material being cut and the frequency of “crashes” or slag buildup. In a high-production environment, a nozzle might last 8 to 24 hours of active cutting. However, if the nozzle is well-maintained and never touches the workpiece, it can last much longer. Always replace it if the orifice is deformed or if centering becomes difficult.
2. Can I use regular glass cleaner on my laser lens?
Absolutely not. Regular glass cleaners contain detergents, perfumes, and water that leave a residue. This residue will absorb laser energy and cause the lens to burn. Only use 99.9% anhydrous isopropanol or specialized optical cleaning fluids recommended by HARSLE, along with lint-free wipes.
3. Why does my protective window keep burning?
Frequent burning of the protective window is usually caused by “back-splatter” during the piercing process. To prevent this, ensure your pierce parameters (height, gas pressure, and power) are optimized. Additionally, check that your assist gas is clean and dry; moisture in the gas line can cause contaminants to settle on the window.
4. What is the difference between a single and a double nozzle?
Single nozzles are typically used for nitrogen cutting (stainless steel, aluminum) where high gas volume is needed to blow away the melt. Double nozzles are used for oxygen cutting (carbon steel), as they help stabilize the oxygen flow and improve the quality of the exothermic reaction. Using the wrong type will result in poor cut quality.
5. How do I know if my focusing lens is damaged?
If you have replaced the protective window and the nozzle, but the cut quality is still poor or the focus seems to “drift” during a long cut, the focusing lens is likely contaminated or damaged. You may see a “blue” or “hazy” tint on the lens surface, indicating that the anti-reflective coating has been compromised.
6. Does the type of metal I cut affect maintenance frequency?
Yes. Cutting galvanized steel or aluminum produces more fine dust and splatter than clean cold-rolled steel. If you are cutting reflective or “dirty” materials, you should increase the frequency of your lens and nozzle inspections to prevent buildup.
7. Why is nozzle centering so important?
If the beam is not centered, the gas flow will be asymmetrical around the beam. This causes the melt to be blown away unevenly, leading to burrs on one side of the part and a clean edge on the other. It also increases the risk of the beam hitting the copper nozzle, which can melt the nozzle and damage the optics through reflection.


